Spring Chicken – Easter Craft

We made some cute little chicks today at our mother and toddler group. They were very easy and lots of fun.

20130320-131929.jpg
All you need are some little scraps of yellow and orange card, a couple of googley eyes (or you could draw them on) and a little ribbon for hanging. The photo below shows what shapes to cut from the card.

20130320-132147.jpg
My little girls decided the ribbon should be longer so they could wear them as a necklace. You are never too young to accessorise. They make an adorable necklace.

Away in a Manger

The craft we did at or toddler group this week was nativity themed and it was followed by a simple service by the church who run it. It was all very sweet and the kids were dressed as angels, stars, wise men, many Mary’s and lots of sheep.
20121220-110332.jpg
I glued the wooden sticks together in advance with a blob of hot glue and then the children drew a face on a circle, glued a triangle onto the manger, added straw and a ribbon hanger. Nice and simple. The one above was made by T age 3.

Bless my Elf on the Shelf

I came home late from college the other night with my head swimming with the things I still needed to do before bed. As I was running around like a loon and really resenting this busy time of year I came across something so beautiful it really made me stop and think.
20121211-211203.jpg
Our little elf has been hopping around the house each night surprising the kids with his antics. I looked up to find he had already found a spot for the next day. There he sat on my kitchen window sill surrounded by all our well loved and well played with nativity ornaments that I place around the house to help the children remember the true meaning of christmas. Here they all were, gathered together with our elf reading them the Christmas story from the Bible. This was a perfect reminder to me of the true meaning of christmas. I stopped in my tracks with a heart full of gratitude for our little elf on the shelf, for my wise and caring husband but mostly for the little baby Jesus, who he was and is and all that he means to me.

Cinnamon hearts

My friend passed this recipe on to me a while back and I was determined I was going to make them before the season was out. There never seemed to be a free moment but today I decided – do or die, I was going to make cinnamon hearts. As it turned out, it may not have been the best day as it was crazy busy, and I forgot about them in the oven. They are a few shades darker than I would have liked them to be (a polite way of saying I burnt them), but hey, they still smell good. In fact, they smell great, almost good enough to eat, that’s why I thought it best to label the packaging. I don’t want to be responsible for any broken teeth if people think they are meant as a treat. And although they smell great, I’m not sure the PVA glue would taste too good.
20121211-200148.jpg
They are really easy to make. The recipe is below. You just mix it all up into a dough, roll out to about 0.5 cm thick and use any shape cookie cutters you feel like. I used a straw to cut out a hole for some ribbon at the top. Bake on a low heat 175f for an hour turning half way through.

I can try and describe the smell that fills the house while these are baking, but really it is something best experienced for yourself. Divinely delicious, festively flavoursome! I had a Yankee Candle that I enjoyed burning that filled the house with the smell of apple and cinnamon until J decided it made him feel sick and blew it out every day he came home from school. This was at least 10 times stronger than the candle and J actually liked the smell. I’m on to a winner. My house gets filled with so many interesting odours through the week, it’s great to have a nice one today. Especially when it is associated with all things festive and lovely. I’m glad I got to make them before Christmas. It’s so important when your “to do” list is so full to make time to tick a few things off your “would like to do” list.

Cinnamon Dough Decorations

6 tbls apple sauce
10 tbls cinnamon
1 tsp ground cloves
2 tsp white glue (pva)

Advent Calendars

We made advent calendars at a class I went to with T and C this week, and I thought they were a great idea that was well worth sharing. We have two, but this is the one you can actually see the picture on, the other one is a wee bit glittery!

20121128-170454.jpg
The picture was cut from from a Christmas card and glued into the centre of a paper plate which had the numbers 1 – 25 pre written around the edge. Then we had LOADS of fun with the glitter – I’m going to sparkle for a week. We added a hanging ribbon at the top and a little festive peg, which you move around the plate each day. So simple.

There are some really great ideas out there for Christmas countdowns that the children can make. These are a few of my favourites.

This one is a printable calendar from inviting printables. Each day you add a cotton wall ball to build up the beard.
20121128-170417.jpg
This one by maya made is just toilet rolls, you’d need 25 so would have to start collecting early, or ask the neighbours. The bottom is folded closed and they are wrapped with fabric scraps. You could use Christmas wrapping paper and they are large enough to fit a few treats in if you have a larger family.

20121128-171633.jpg
I love these trees, but couldn’t find the source. They would have fun making them and decorating them all and you can hide a surprise underneath.

20121128-172158.jpg
This is cute from La Classe dells maestro valentina. Each day you snip Santa’s beard a little shorter.

20121128-172841.jpg
Have fun and enjoy the countdown to Christmas, however you choose to do it.

Paper Tree Christmas Craft

When I was asked to do a craft workshop for a ladies group at my church, I spent a lot of time on Pinterest looking for ideas. I tried to convince myself it was important research, but really, I was just making the most of having a good reason to be browsing.
I needed a quick, cheap and easy craft that would be achievable by everyone there, and when I came across some cute little trees on Martha Stewart’s website, I thought they would be ideal.

20121211-205025.jpg
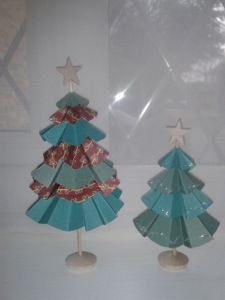
I adapted the idea slightly to use supplies I already had, and thought they would look great if we used a little patterned paper.
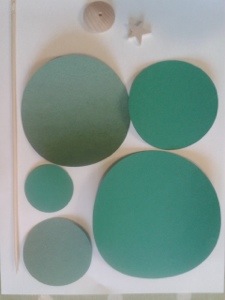
The trees start off as a kebab stick, which is cut to your required length and stuck in a stand of some kind. I drilled a hole in some little wooden discs I had. Circles of decreasing diameter are folded and glued to the stick and then it is finished off with a little bead or star. Again, I drilled into some little wooden stars I had left over from a different project.

20121211-205219.jpg
As it turned out, and much as I love the ladies at my church, I think we would all agree that they didn’t find it as easy as I thought they would. For some people, folding paper was really tricky.
So I’m just going to give some tips that might help to make the tree more successful.

1. The size and number of your circles will determine the size of your tree. We found that 4 3/4″, 4″, 3 1/4″, 2 1/2″ 1 3/4″ worked well.

2. The folds are made by folding the circle in half and making a sharp crease. It is best to open it out before making the next fold. Always make sure the fold lines meet up to get evenly spaced creases. Keep going until there are 16 folds.

20121211-205354.jpg

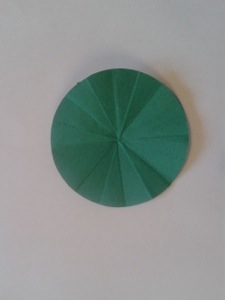
3. It is very easy to cut the hole in the centre too big for the stick. We just poked the stick through the centre in the end, to make a tight hole.

4. Put all the circles on the stick, glue on the topper, then arrange and fix each circle one at a time from the top down, using a blob of glue underneath to attach the circle to the stick. Then cut your stick to the the length you want and glue it to the stand.

This is a fun project because you can get a little creative with it. We had all sorts of trees on the night, bright multi patterned ones, long tall ones, glittery ones, short squat ones, and each one looked delightful and each one was unique.

To Wrap or not to Wrap?

When it comes to craft fairs I’m always a little stumped about how best to wrap the things people buy. Should I gift wrap or offer a bag? In the past I have just used white tissue paper and a touch of tape. This year I have been trying to come up with other ideas that might be a little more special.

There are certain things that I really have to take into account. Firstly, the cost. Any spend on wrapping is going to eat into my profits, so the more I can save on wrapping, the happier I will be. Secondly, thinking optimistically, there may not be much time for wrapping, so it has to be quick and not too fiddly. Thirdly, it needs to look cute without too much preparation, because life is busy.

So after sifting through all the beautiful wrapping ideas there are on Pinterest, these are a few I found that I think would be perfect for a craft fair.

I love this printed gift bag I found at Thirty Handmade Days. It can be adapted so easily with a trading name or logo, and the little tie is a lovely touch.

This is an effective way of dressing up white tissue paper that I found at Charm Home. Just a strip of festive patterned paper wrapped around my packages would make all the difference to how they look.

20121026-222145.jpg

Brown paper packages tied up with string – dare I say, that these are one of my favourite things. So easy to do, and the heart just tucked into the string could easily be cut from Christmas paper. Wish I knew who to give the credit of this one to, but there seemed to be a bad link from the Pinterest image. So, I’m off to sort through my supplies, with these ideas fresh in my head and I’ll see what I can come up with before next week to make my wrapping look pretty.

The most wonderful time of the year!

20121024-234718.jpg
I love this time of year. Before I can begin to think about preparing for Christmas at home I have the lead up to the Christmas craft fairs. It starts early for me this year with a Christmas shopping evening at Loddon Primary school on the 6th Nov. This is followed by a fair on 10th Nov at Trinity Church. It is a great way to sell and I really enjoy meeting other like minded stall holders. The range of crafts that you can find at these events is always surprising and it is fun finding that special something for that special someone.

Another Owl

image

It seems my life is full of owls at the moment. That may be because my daughter M has a bit of an obsession with them.
Every year I have to come up with 5 new ideas for birthday cakes. For my son J it is easy. Every year it is a different shaped splodge of icing with eyes, a “flanimal” type monster. But the girls have different plans.
This year I didn’t ask M what she wanted. Sometimes its easier to just suprise them. There are times I have asked and been horrified at the expectation. I knew she would like an owl, and after seeking inspiration on pinterest, this is what I came up with. It was a lot of fun to make and although I am no professional cake decorator, she loved it. And that is the most important thing on a birthday, making someone happy (even if it means making another splodgy monster next year).

Online v. Craft fair

I have spent an interesting and mind stretching day battling with technology and social media. My website is now sorted, I have part sorted out an etsy shop, and am working on linking everything to a facebook page. I guess this post will test to see if it is all working. If not, back to the drawing board.

I know how valuable all these tools are for online selling, but today has really made me look forward to the upcoming Christmas Craft fairs. You turn up with your boxes, make your table look all pretty, job done.  This is a lot of hardwork, but I am assured by everyone that it will be worth it.

A work in progress